Understanding DocsGPT Agents 🤖
DocsGPT Agents are advanced, configurable AI entities designed to go beyond simple question-answering. They act as specialized assistants or workers that combine instructions (prompts), knowledge (document sources), and capabilities (tools) to perform a wide range of tasks, automate workflows, and provide tailored interactions.
Think of an Agent as a pre-configured version of DocsGPT, fine-tuned for a specific purpose, such as classifying documents, responding to new form submissions, or validating emails.
Why Use Agents?
- Personalization: Create AI assistants that behave and respond according to specific roles or personas.
- Task Specialization: Design agents focused on particular tasks, like customer support, data extraction, or content generation.
- Knowledge Integration: Equip agents with specific document sources, making them experts in particular domains.
- Tool Utilization: Grant agents access to various tools, allowing them to interact with external services, fetch live data, or perform actions.
- Automation: Automate repetitive tasks by defining an agent’s behavior and integrating it via webhooks or other means.
- Shareability: Share your custom-configured agents with others or use agents shared with you.
Agents provide a more structured and powerful way to leverage LLMs compared to a standard chat interface, as they come with a pre-defined context, instruction set, and set of capabilities.
Core Components of an Agent
When you create or configure an agent, you’ll work with these key components:
Meta:
- Agent Name: A user-friendly name to identify the agent (e.g., “Support Ticket Classifier,” “Product Spec Expert”).
- Describe your agent: A brief description for you or users to understand the agent’s purpose.
Source:
- Select source: The knowledge base for the agent. You can select from previously uploaded documents or data sources. This is what the agent will “know.”
- Chunks per query: A numerical value determining how many relevant text chunks from the selected source are sent to the LLM with each query. This helps manage context length and relevance.
Prompt: The main set of instructions or system prompt that defines the agent’s persona, objectives, constraints, and how it should behave or respond.
Tools: A selection of available DocsGPT Tools that the agent can use to perform actions or access external information.
Agent type: The underlying operational logic or architecture the agent uses. DocsGPT supports different types of agents, each suited for different kinds of tasks.
Understanding Agent Types
DocsGPT supports several agent types, each with a distinct way of processing information. The code for these can be found in the application/agents/ directory.
1. Classic Agent
The Classic Agent follows a traditional Retrieval Augmented Generation (RAG) approach: it retrieves relevant document chunks, augments the prompt context with them, and generates a response. It can also use configured tools if the LLM decides they are necessary.
Best for: Direct question-answering over a specific set of documents and straightforward tool use.
2. Agentic Agent
Unlike Classic which pre-fetches documents into the prompt, the Agentic Agent gives the LLM an internal_search tool so it can decide when, what, and whether to search. This means the LLM controls its own retrieval — it can search multiple times, refine queries, or skip retrieval entirely if the question doesn’t need it.
Best for: Tasks where the agent needs to dynamically decide how to gather information, use multiple tools in sequence, or combine retrieval with external tool calls.
3. Research Agent
A multi-phase agent designed for in-depth research tasks:
- Clarification — Determines if the question needs clarification before proceeding.
- Planning — Decomposes the question into research steps with adaptive depth based on complexity.
- Research — Executes each step, calling tools and refining queries as needed.
- Synthesis — Compiles findings into a final cited report.
Includes budget controls for max steps, timeout, and token limits to keep research bounded.
Best for: Complex questions that require multi-step investigation, gathering information from multiple sources, and producing structured reports with citations.
4. Workflow Agent
Executes predefined workflows composed of connected nodes (AI Agent, Set State, Condition). See the Workflow Nodes page for details on building workflows.
Best for: Structured, multi-step processes with branching logic and shared state between steps.
The legacy “ReAct” agent type is still accepted for backwards compatibility but maps to the Classic Agent internally. New agents should use Classic, Agentic, or Research instead.
Navigating and Managing Agents in DocsGPT
You can easily access and manage your agents through the DocsGPT user interface. Recently used agents appear at the top of the left sidebar for quick access. Below these, the “Manage Agents” button will take you to the main Agents page.
Creating a New Agent
- Navigate to the “Agents” page.
- Click the “New Agent” button.
- You will be presented with the “New Agent” configuration screen:
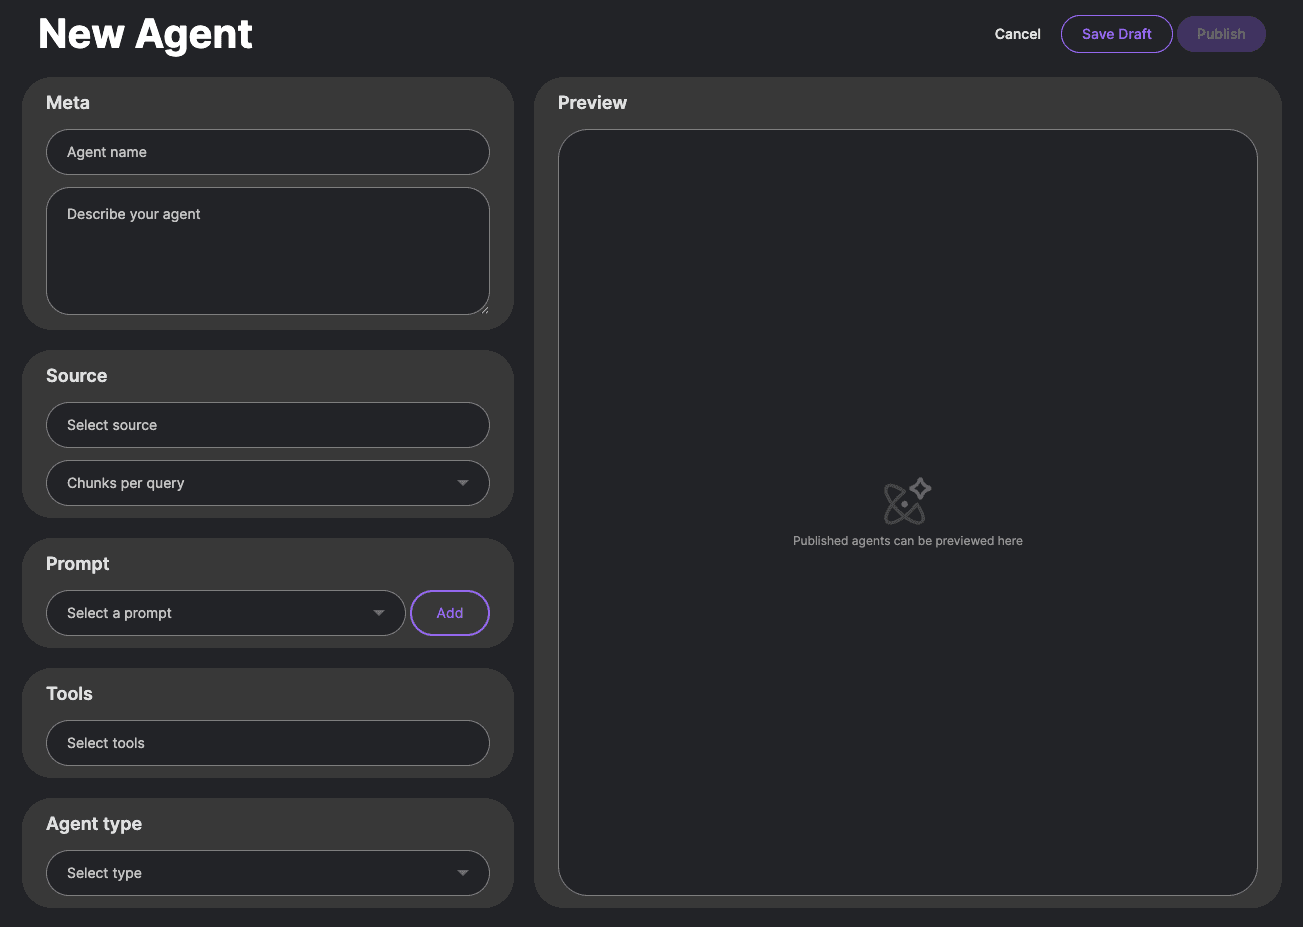
- Fill in the fields as described in the “Core Components of an Agent” section.
- Once configured, you can “Save Draft” to continue editing later or “Publish” to make the agent active.
Interacting with and Editing Agents
Once an agent is created, you can:
- Chat with it: Select the agent to start an interaction.
- View Logs: Access usage statistics, monitor token consumption per interaction, and review user message feedbacks. This is crucial for understanding how your agent is being used and performing.
- Edit an Agent:
- Modify any of its configuration settings (name, description, source, prompt, tools, type).
- Generate a Public Link: From the edit screen, you can create a shareable public link that allows others to import and use your agent.
- Get a Webhook URL: You can also obtain a Webhook URL for the agent. This allows external applications or services to trigger the agent and receive responses programmatically, enabling powerful integrations and automations.
- Use it via API: Every agent exposes an API key that can be used with the native Agent API or the OpenAI-Compatible API so you can drop DocsGPT Agents into any tool that already speaks the chat completions protocol.
Seeding Premade Agents from YAML
You can bootstrap a fresh DocsGPT deployment with a curated set of agents by seeding them directly into the user-data store (Postgres).
- Customize the configuration – edit
application/seed/config/premade_agents.yaml(or copy fromapplication/seed/config/agents_template.yaml) to describe the agents you want to provision. Each entry lets you define prompts, tools, and optional data sources. - Ensure dependencies are running – Postgres must be reachable using
POSTGRES_URIfrom.env(schema applied viapython scripts/db/init_postgres.py), and a Celery worker should be available if any agent sources need to be ingested viaingest_remote. - Execute the seeder – run
python -m application.seed.commands init. Add--forcewhen you need to reseed an existing environment.
The seeder keeps templates under the system user so they appear in the UI for anyone to clone or customize. Environment variable placeholders such as ${MY_TOKEN} inside tool configs are resolved during the seeding process.